3. Equation Editor
3.1 Basic Operations
3.1.1 WYSIWYG (What you see is what you get)
WYSIWYG is the basic editing mode of AxMath. In the equation editing area, you can edit your equations like any other text editors. When you need special math symbols, you can simply click and choose, using shortcuts or using mixed-LaTeX to quickly insert.
The cursor shows the current editing position. You can use mouse click, Home Key, End Key and four arrow keys to move your cursor.
3.1.2 Active text styles
The toolbar button ( ) indicates the current active text style. They can combine as normal, italic, bold, italic and bold 4 styles.
3.1.3 Modify text styles
If you want to change the text styles, you can choose the text and use right click menu or these toolbar ( ) modify, corresponding to the shortcuts Ctrl+1/2/3/4.
3.1.4 Use mouse wheel to control view
When the pointer is in the editing area, you can move your mouse wheel up or down to scroll the view, and move the wheel while pressing Shift Key to move left or right. And move the wheel while pressing Ctrl to zoom in and out.
3.2 Symbol Panel
3.2.1 Symbol panel scroll and group switch
AxMath uses scrollable panels to display all math symbols. The symbols are classified by different groups and you can either click the panel tag or use mouse wheel to switch over. Click the symbol and then it will appear in the editing position.
Of course you can customize the panels order by right clicking the panels.
3.2.2 Set up the appearance and colors of the symbol panel
The symbol panels can be easily customized. First right click any symbol on the panel, than choose "Appearance" in the popup menu, and you can see an appearance setting dialog.
Symbol panels support multiple backgrounds, making it easy to distinguish. Right click any symbol on panel, and you can set multi-background and the panel background.
3.2.3 Symbols re-mapping and symbol panel expansion
Some groups of symbol panel (binary operator) contains numerous symbols, by default you can only see the frequently-used symbols. Thus you need to click ( ) to expand all symbols. These panels also allows you to re-mapping the symbol positions, you can right click the symbol button to define them as you wish.
3.3 Shortcuts
3.3.1 Define shortcuts

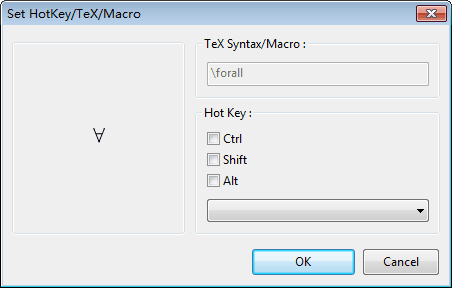
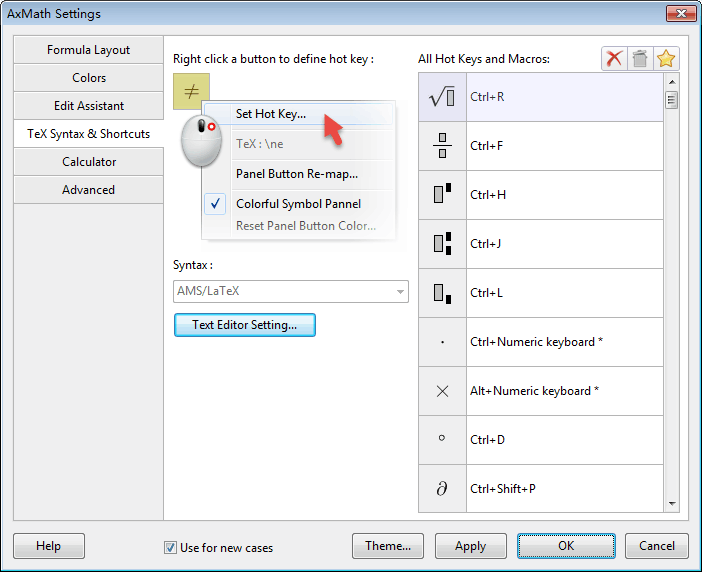
 Figure 3.1
All math symbols on panel can bind a shortcut(hotkey). On the symbol panel, you can right click a symbol button and then a menu pops up. Choose "Set Hotkey" and appear a "Set HotKey/TeX/Macro" dialog, then you can set the shortcuts.
Shortcuts are the combinations of auxiliary key and main key. Auxiliary key includes Ctrl, Alt, Ctrl+Shift, Ctrl+Shift, Alt+Shift and Ctrl+Alt+Shift, main keys can be chosen from the drop-down box. They can be characters, numbers, punctuations or arrow keys. Shortcuts are case insensitive. Notice: the system reserved shortcuts can't be redefined, e.g. Ctrl+C represents copy.
You can right click the symbol panel to view the shortcuts. Also you can click  to set up and modify it in "Syntax and shortcuts" tab control.
3.3.2 Default shortcuts
table
3.4 Quick input Greek symbols
3.4.1 Greek keyboard
Click the ( ) button on toolbar. The current keyboard will switch to Greek keyboard, which can continuously input Greek symbols.
3.4.2 Temporary switch of Greek keyboard
When in the state of English Keyboard, press shortcut "Ctrl+G" you can temporarily switch to Greek keyboard, and it will return to the normal state after input a character. For example, press "Ctrl+G", "d", "e", the editing area will output "".
 Figure 3.2 Comparison of Greek Keyboard
3.4.3 Mixed LaTeX Syntax
Press the button ( ) and the current keyboard will change into the English keyboard with LaTeX syntax support. You can type with LaTeX syntax to enter Greek symbols, e.g. "\alpha", press enter and it will turn into Greek symbol "".
3.5 Use LaTeX to input equations
3.5.1 LaTeX syntax editor
Click the toolbar button ( ) "Ctrl+Tab" to switch to LaTeX editing mode. You can type in LaTeX script within the bottom area of the interface. Then press the (
 ) button or press "Shift+Enter", it will convert the LaTeX script into equation.
Press the (
 ) button on toolbar, will re-convert the equation into LaTeX script.
Syntax editor can highlight both the symbols and syntax. Within the script editing area, right click and trigger the popup menu, then choose "text editor preferences" and open a setup dialog. You can also press (
 ) button and open the dialog in "TeX Syntax & Shortcuts" tab.
3.5.2 Mixed LaTeX Syntax
Press the toolbar button ( ) and then switch to the LaTeX syntax English keyboard. Now you can type in escape characters such as "\", "^" or "_", the following strings will turn into blue, press "Enter" and the blue part will be converted into equations according to LaTeX syntax.
 Figure 3.3 Equation by Mixed LaTeX syntax
3.6 Editor's Auxiliary functionalities
3.6.1 Auto correction of function's font
The font styles of AxMath includes normal(A), italic(A), bold(A) and italic-bold(A). AxMath offers the auto-correction functionality which enables the matching field change into the pre-defined styles. For example, the pre-defined style of "sin" is normal, when you enter "sin" string, the font will automatically change into normal.
Press the toolbar button ( ), in the "editor auxillary functions" tab press the top-right toolbar or use the right-click menu you can add or edit the pre-defined functions.
AxMath has many pre-defined functions which can be loaded by "load default" on toolbar.
3.6.2 Other auxiliary functionalities
AxMath also offers auto-correction of characters, numbers, punctuations and halving line. Press the ( ) button on the toolbar, you can turn on or turn off these functions.
3.7 Clipboard and drag & drop
3.7.1 Composite data
By default, you can use the (Ctrl+X) and (Ctrl+C) in equation editing area, the data structure is AxMath composite data type. This can be pasted within AxMath, between multiple AxMath windows or directly into Word.
3.7.2 Plain-text data
AxMath also offers plain text data type. Right click menu and choose "Copy As Text", then you can copy the the text (latex syntax) to clipboard.
3.7.3 Paste
When you paste a pre-copied object using (Ctrl+V). AxMath will automatically detect the data structure and use the right way to paste. You can also set this in ( ) Advanced.
3.7.4 Drag & drop
Press the left button to choose the equation or area you want to select, and move to the destination and release the button. If you press the Ctrl key during the drag and drop process, it will copy the chosen part into the position.
3.8 Sidebar Tools: Notes, Magnets and References (Formula Warehouse)
3.8.1 Notes
AxMath notes is like a clipboard manager. AxMath will store all your equations in a list in time order from the newest to the oldest. You can also drag or double-click the equations to the editing area. Or add equations to Notes by dragging.
3.8.2 Magnets
AxMath magnets allow user to save a series of equations to a fixed combination. It's useful when you type repeated content. Magnets can be dragged or double-clicked to the editing area.
In editing area, you can drag the selected content to Magnets to create a new one. If you press Ctrl, it will update the magnet content.
3.8.3 References (Formula Depot)
AxMath offers local formula depot functionality. You can use the depot to view, search and store equations. You can easily add them to the editing area by double-click them. It will increase your efficiency significantly.
3.8.4 Formula depot list and edit
3.8.5 Reference list usage and edit
3.8.6 Sharing formula
Formula depot store formula as a file in your computer. You can share them with your co-workers. Later, we'll also present an online equation depot to save your very own equations.
3.9 Color Setup
3.9.1 Single/Multi color trigger
AxMath support both single and multi color display. Press the toolbar button ( ) to switchover.
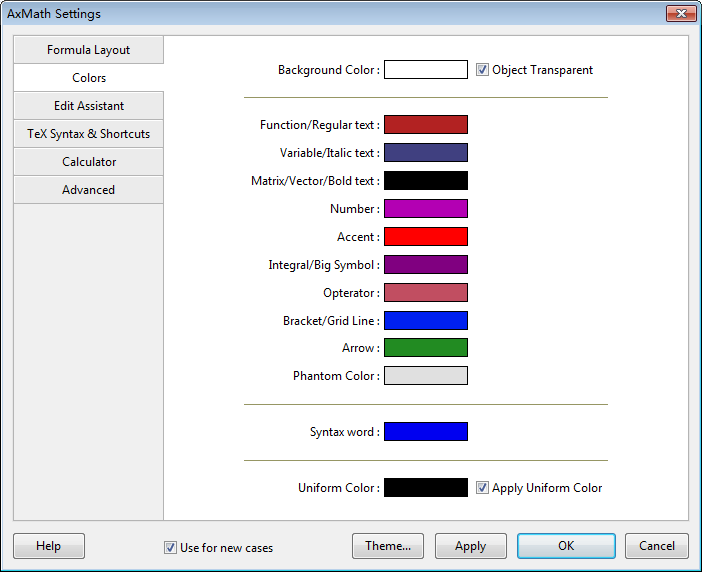
3.9.2 Color preferences
Press button ( ), you can set your own colors in Color Preferences panel.

Figure 3.5 Color preferences
3.10 Find and Replace
3.10.1 String find and replace
AxMath supports string find and replace, you can press main menu -> edit -> find and replace or press Ctrl+F3 to open "Find and Replace String" dialog.
3.10.2 Global find and replace
AxMath supports global find and replace of any kind of content. In the editing area, you can find what you want. Press main menu -> edit -> find next or press F3 to highlight the same content as selected.
3.10.3 Erase the find mark
You can press main menu -> edit -> erase search mark or press ESC to clear the last result.
3.11 Quick Matrix Template
3.11.1 Quick matrix template, auto completion and blocking
AxMath支持快速矩阵模板、矩阵自动填充和分块。在符号面板的矩阵(如图3.8 A)选项卡中点击新建自定义矩阵或向量(图3.8 A红框内的按钮),在弹出的对话框中设置好矩阵的行列数、对齐方式、分块之后,点击“创建并填充…”按钮,即可设置自动填充字符。或者点击“常见格式”按钮选择常见矩阵模板。
3.11.2 Modify matrix
若需要对已经创建的矩阵进行修改,可在公式编辑区中选中该矩阵,然后在右键菜单中选择菜单项“设置所选矩阵和向量”的子菜单进行修改。
3.12 Self-defined Math Symbols
AxMath支持用户自定义符号,依次点击主菜单( )、编辑、定义符号(或按下键盘F4)可打开自定义符号面板(图3.10 A)。在此对话框中点击按钮“新建…”可打开符号编辑器(图3.10 B)来新建一个符号。